
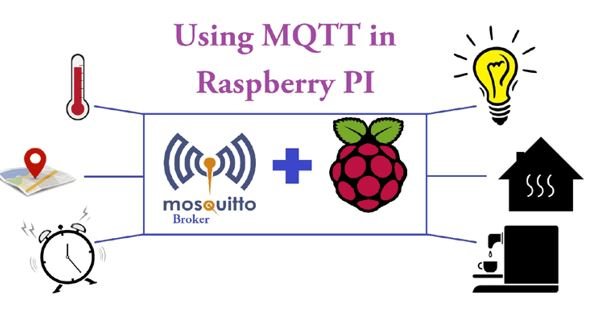
Introduction
The Internet of Things (IoT) is a technology where smart devices around us communicate with each other and share data. Since IoT devices operate with very low power and low data usage, they require a lightweight and fast communication protocol such as MQTT (Message Queuing Telemetry Transport).
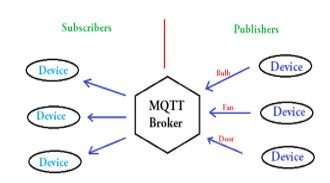
MQTT follows a Publish–Subscribe communication model:
• The publishing device sends data
• The subscribing device receives that data
Because of this simplicity and efficiency, MQTT is widely used in ESP32 modules, sensor nodes, and smart home devices.
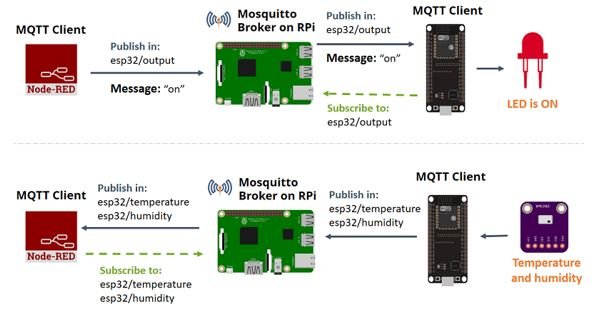
In this project:
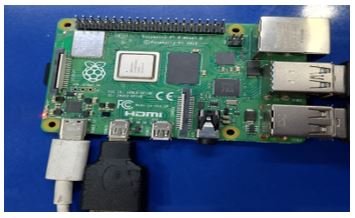
Raspberry Pi → works as the Mosquitto MQTT Broker
ESP32 → works as an MQTT Client, meaning it publishes sensor data and receives commands sent from the Raspberry Pi.
With this setup, data can be transferred from the ESP32 to the Raspberry Pi very quickly, reliably, and with minimal network usage.
Using MQTT provides several advantages:
* Low network data consumption
* Fast message transfer
* Easy and stable connectivity
* Scalable for large IoT networks
In this project, we install the Mosquitto MQTT Broker on the Raspberry Pi and test the entire IoT communication flow using the ESP32.
BOM - Bill of Material
S.No. | Component | Qty | Purpose |
1 | Raspberry Pi (4B MODEL) | 1 | MQTT Broker (Mosquitto) |
2 | ESP32 Board | 1 | MQTT Client |
3 | DHT11/DHT22 Sensor | 1 | Temperature/Humidity input |
4 | Jumper Wires | As needed | Connections |
5 | Breadboard | 1 | Sensor mounting |
6 | 5V Power Adapter | 1 | Power for RPi |
7 | USB Cable | 1 | Power for ESP32 |
8 | Micro SD Card | 1 | Raspberry Pi OS |
9 | Wi-Fi Router | 1 | Network for MQTT |
What is MQTT?
MQTT (Message Queuing Telemetry Transport) is a lightweight and efficient messaging protocol designed for fast communication between devices, especially in IoT (Internet of Things) systems. It uses very low bandwidth, works reliably even on weak network connections, and is ideal for sensors, microcontrollers, and small embedded devices.
MQTT is based on a Publish–Subscribe (Pub/Sub) communication model, which separates the sender and receiver, making data transfer simple, flexible, and highly scalable.
There are few terms which are used frequently in MQTT:
1. Subscribe
2. Publish
3. Broker
1. Subscriber
A Subscriber is the device that receives data.
It subscribes to a specific topic and gets messages delivered by the Broker.
Example: A mobile app, raspberry pi, or another ESP32 receiving the temperature.
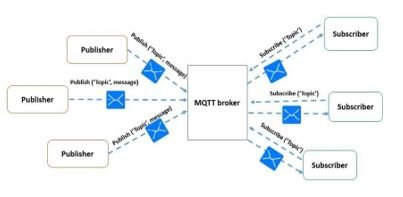
2. Publisher
A Publisher is the device that sends data.
It publishes messages (like sensor readings or commands) to the MQTT Broker.
Example: An ESP32 publishing temperature data.
3. Broker
The Broker is the central server that manages all MQTT communication.
It receives messages from publishers, filters them, and forwards them only to the subscribers who have requested that topic.
Examples of MQTT Brokers:
• Mosquitto (Raspberry Pi)
• Hive MQ
• AWS IoT Core
• Azure IoT Hub
Installing Mosquitto MQTT Broker on Raspberry Pi
Open the terminal in your Raspberry pi and type the following commands to install the broker
STEP 1:
sudo apt update
sudo apt install -y mosquitto mosquitto-clients
Wait for the installation to finish. Now, to start the broker on startup of raspberry pi, Type the following command
STEP 2:
sudo systemctl enable mosquitto.service
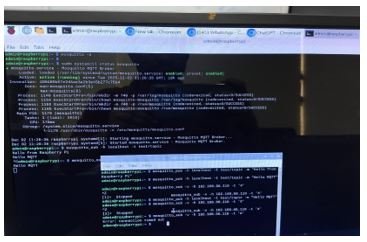
That’s it, we are all set to launch our MQTT broker. To check it is installed properly, enter the following command
STEP 3:
mosquitto -v
This command will give you the version of your MQTT broker.
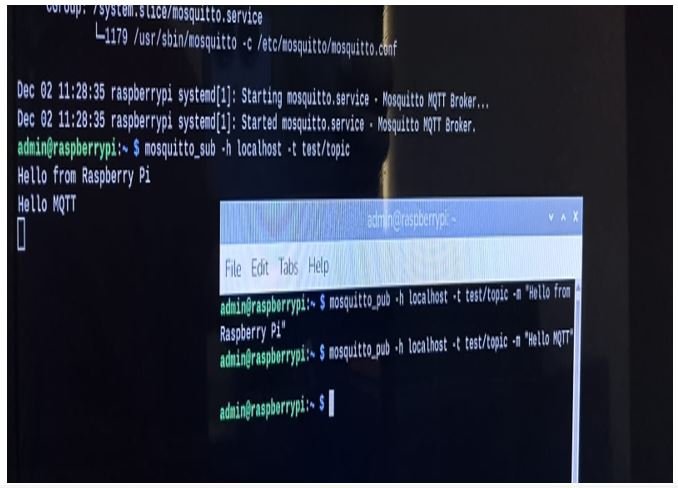
Testing the Raspberry Pi Mosquitto Broker
Once Mosquitto is installed on the Raspberry Pi, the next step is to verify that the MQTT Broker is working correctly. MQTT provides two simple test tools:
· mosquitto_pub (Publisher)
· mosquitto_sub (Subscriber)
These tools help you check if messages can be published and received through the broker.
Terminal-1 → Subscriber (receives messages)
This terminal listens to a topic.
Run the command in raspberry pi terminal:
mosquitto_sub -t test/topic
à Terminal-1 now waits for any message published to test/topic
à It will display the message instantly
Terminal-2 → Publisher (sends messages)
Run the command in raspberry pi terminal:
mosquitto_pub -t test/topic -m “Hello MQTT”
àThis sends “Hello MQTT” to the MQTT Broker
à Terminal-1 will show this message immediately
Expected Output
Terminal-1 (Subscriber):
mosquitto_sub -t test/topic
Hello MQTT
Terminal-2 (Publisher):
mosquitto_pub -t test/topic -m “Hello MQTT”
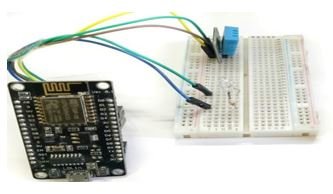
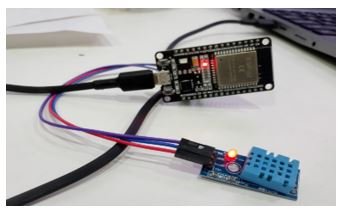
ESP32 + DHT11 Block Diagram

ESP32 + DHT11 Pin Connections
DHT11 Sensor Pin | ESP32 Pin | Description |
VCC | 3.3V | Power supply for DHT11 |
DATA | GPIO 2 (or any GPIO) | Signal/data output |
GND | GND | Ground |
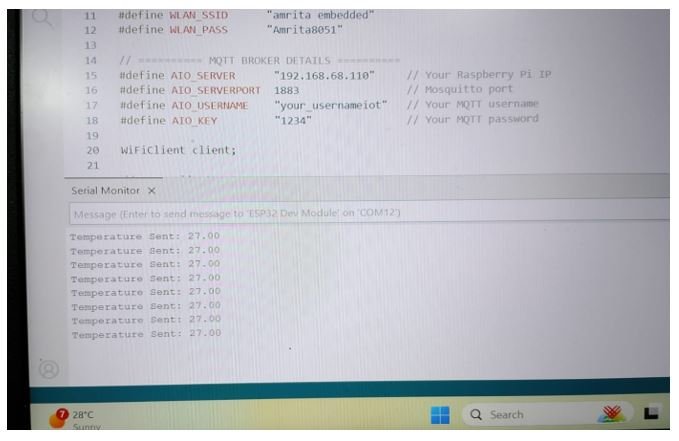
ESP32 + DHT11 + MQTT Source Code
#include <WiFi.h>
#include “Adafruit_MQTT.h”
#include “Adafruit_MQTT_Client.h”
#include “DHT.h”
// ========== PIN CONFIG ==========
#define LED 5 // GPIO5
#define DHTPIN 2 // GPIO2
// ========== WIFI DETAILS ==========
#define WLAN_SSID “amrita embedded”
#define WLAN_PASS “Amrita8051”
// ========== MQTT BROKER DETAILS ==========
#define AIO_SERVER “192.168.68.110” // Your Raspberry Pi IP
#define AIO_SERVERPORT 1883 // Mosquitto port
#define AIO_USERNAME “your_usernameiot” // Your MQTT username
#define AIO_KEY “1234” // Your MQTT password
WiFiClient client;
// MQTT Client Setup
Adafruit_MQTT_Client mqtt(&client, AIO_SERVER, AIO_SERVERPORT, AIO_USERNAME, AIO_KEY);
// MQTT Topics
Adafruit_MQTT_Publish Temperature =
Adafruit_MQTT_Publish(&mqtt, “home/temperature”);
Adafruit_MQTT_Subscribe led1 =
Adafruit_MQTT_Subscribe(&mqtt, “home/led”);
// DHT11 Setup
#define DHTTYPE DHT11
DHT dht(DHTPIN, DHTTYPE);
// Function Declaration
void MQTT_connect();
void setup() {
Serial.begin(115200);
pinMode(LED, OUTPUT);
Serial.println(“ESP32 MQTT + DHT11 + LED”);
// WiFi Connection
Serial.print(“Connecting to WiFi: “);
Serial.println(WLAN_SSID);
WiFi.begin(WLAN_SSID, WLAN_PASS);
while (WiFi.status() != WL_CONNECTED) {
delay(500);
Serial.print(“.”);
}
Serial.println(“\nWiFi Connected!”);
Serial.print(“IP Address: “);
Serial.println(WiFi.localIP());
dht.begin();
mqtt.subscribe(&led1);
}
void loop() {
MQTT_connect();
// Check subscription messages
Adafruit_MQTT_Subscribe *subscription;
while ((subscription = mqtt.readSubscription(100))) {
if (subscription == &led1) {
int state = atoi((char *)led1.lastread);
digitalWrite(LED, state);
Serial.print(“LED Status: “);
Serial.println(state);
}
}
// Read Temperature
float t = dht.readTemperature();
if (isnan(t)) {
Serial.println(“DHT Sensor Error!”);
return;
}
// Publish Temperature
if (Temperature.publish(t)) {
Serial.print(“Temperature Sent: “);
Serial.println(t);
} else {
Serial.println(“Publish Failed!”);
}
delay(2000);
}
// MQTT Connection Function
void MQTT_connect() {
int8_t ret;
if (mqtt.connected()) {
return;
}
Serial.print(“Connecting to MQTT… “);
uint8_t retries = 3;
while ((ret = mqtt.connect()) != 0) {
Serial.println(mqtt.connectErrorString(ret));
Serial.println(“Retrying in 5 seconds…”);
mqtt.disconnect();
delay(5000);
retries–;
if (retries == 0) {
while (1); // stop execution
}
}
Serial.println(“MQTT Connected!”);
}
Arduino IDE Explanation (Step-by-Step)
Step 1: Install Libraries
In Arduino IDE:
Sketch → Include Library → Manage Libraries
Install:
· PubSubClient
· DHT sensor library
· Adafruit Unified Sensor
(ESP32 Wi-Fi library is built-in)
Step 2: Select ESP32 Board
Tools → Board → ESP32 Dev Module
Tools → Port → Select correct COM port
Step 3: Enter Wi-Fi Details
Update:
const char* ssid = “YOUR_WIFI”;
const char* password = “YOUR_PASSWORD”;
Step 4: Upload the Code
Click Upload
Open Serial Monitor → 115200 baud
You should see:
Wi-Fi Connected!
Published Temperature: 27.0
Published Temperature: 27.0
Expected Output of ESP32 Publisher (Serial Monitor)
Raspberry Pi → MQTT Broker
The Raspberry Pi is the MQTT Broker because:
· It runs the Mosquitto server
· It receives all messages from publishers
· It distributes messages to all subscribers
· It manages topics and connections
Raspberry Pi = Central server → Broker
Subscriber → Any Device Receiving Data
A Subscriber is any device that receives data from the broker.
Examples of Subscribers:
àRaspberry Pi terminal
When a device runs:
mosquitto_sub -t home/temperature
Raspberry Pi Subscriber Terminal Output

PROJECT IMAGES (ESP32 + DHT11 + MQTT + Raspberry Pi)
Publisher
MQTT Broker
Subscriber
MQTT Applications
Home Automation – Controls smart home devices.
Industrial Automation – Connects machines and sensors.
Smart Farming – Monitors soil and automates irrigation.
Health Monitoring – Sends real-time patient data.
Smart Cities – Manages lights, traffic, and pollution.
Vehicle Tracking – Provides GPS and fleet monitoring.
Energy Monitoring – Tracks electricity and solar usage.
Smart Metering – Measures utility consumption.
Weather Monitoring – Collects temperature and humidity data.